Texas Injection Molding engineers work with our customers to develop and design the most robust plastic injection molded products. There are four major elements to developing the best possible product:
- Part Design
- Material Selection
- Processing
- Mold Design
Section 1 of this guide was developed as a basic tool to aid our customers in the elements of proper plastic part design. Please see the other sections for help in those areas
Section 1: Part Design Guide
Parting line location depends upon the shape and the function of the part (see Fig. 1). The parting lines is where the two injection mold halves (A side and B side) meet. It is also where a slide mechanism might meet where it shuts off on one of the mold halves. The parting line will always be visible, but can be minimized by its location, draft allowance and part geometry.
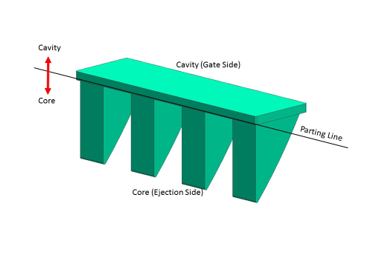 Fig. 1
Undercuts
When designing a plastic part keep in mind that while the plastic goes into the mold as liquid it cools rapidly and solidifies into the shape of the cavity. Designing a part that can be molding using a “straight pull” is key to keeping the cost of the injection mold down. A straight pull mold is designed so that when the two halves (A side and B side) separate from each other, there is no Metal blocking the path of the plastic in the direction of the pull. This means that if there is an undercut like a snap detail, hole on the side or otherwise; that once the part cools it will not eject from the mold unless the undercut is relieved. This is done using slides and lifters in the injection mold. Slides can be either mechanical or hydraulic and are expensive features to add to any mold. Lifters are typically smaller and are always mechanical. (See Fig. 2)
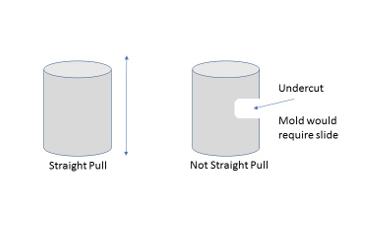 Fig. 2
Draft Allowance
Draft is required on all parts in the direction of mold movement in order for the parts to be ejected from the mold properly. Draft is essential for the ejection of the part from the injection mold. Recommended standard draft angle is 1 deg. with ½ degree, on ribs. (See Fig. 3)
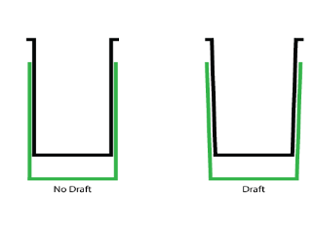 Fig. 3
When an opening is needed such as to accommodate a snap feature and it is going to be formed without using core-pulls, a minimum 5 deg. angle is required. This is called a “kiss-off” and is where the core and cavity meet (see Fig. 4)
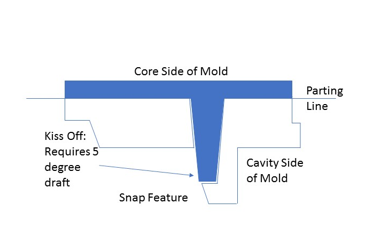 Fig. 4
Wall Thickness and Uniformity
Another essential rule when designing a plastic part is to utilize a uniform wall thickness and to utilize as thin of wall sections as design will allow. Uniform walls aid in material flow in the injection mold, reduce the risk of sink marks, molded in stress and differential shrinkage. In addition, cost savings are the highest when wall sections are kept to a minimum and is consistent. The reason is that parts cool faster with thinner walls, which means that cycle times are shorter, resulting in more parts per hour. On average, the wall thickness of an injection mold part should be .060” to .180”, however, parts can be molded with walls as thin as .020” and as thick as 1.50”. Thick sections on a part will also lead to cosmetic issues such as sink, bubbles and discoloration.
Parts should also be designed with uniform wall thickness. This allows the mold cavity to fill easier without restrictions. Furthermore, if the walls are not uniform the thinner sections will cool first, then as the thicker sections cool and shrink it builds stresses near the boundary between the two. Because the thinner sections have already solidified, they do not yield. As the thicker sections yield, it leads to warping and/or twisting, if severe enough, will cause cracks. For non-uniform walls, the change in thickness should not exceed 20% of the nominal wall (see Fig. 5) and should transition gradually.
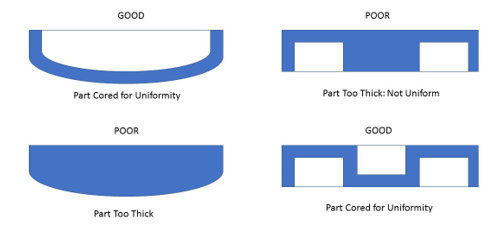 Fig. 5
Coring is a method where plastic is removed from a thick area to help maintain uniformity.
Corners should always be designed with a minimum fillet radius of 50% of the wall thickness and an outer radius of 150% of the wall thickness to maintain uniform wall thickness (see Fig. 6
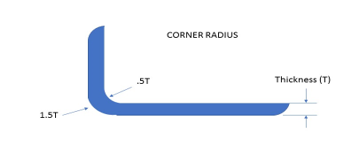 Fig. 6
Bosses
Bosses are normally designed into plastic parts to allow for the installation of threaded inserts, guides pins or self-tapping screws. Avoid stand-alone bosses when possible. Bosses should be attached to walls or ribs by using ribs or gussets for structural stability.
The O.D. of the boss should ideally be 2.5 times the screw or insert diameter. Thick walled bosses with bases greater than 60% of the wall will show sink marks. To help overcome this condition, a thinner walled boss of 2 times screw diameter or less can have multiple ribs (see Fig. 7). Bosses should be avoided entirely on parts with polished surfaces as they will most always show sink marks or at minimum cause “ghosting” on the cosmetic surface.
The thickness at the base of the ribs used to stabilize a boss should not exceed 60% of the thickness of the adjoining wall. Boss inside and outside diameters should have ½ deg. draft per side.
Bosses should be isolated from the corner to avoid thick sections and aid in the elimination of sink marks.
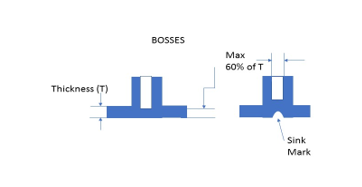 Fig. 7
Gussets and Ribs
Gussets and/or ribs should be used to add stiffness and strength. Ribs can also be used to help fill a part. In parts that are primarily structural and not cosmetic, rib base thickness (t) can be up to 80% of the adjoining wall thickness (T). However, for appearance parts, where sink marks are objectionable, rib thickness (t) should not exceed 60% of the adjoining wall thickness (T) if the outer surface is textured and only 30% if outer surface is a high polish.
Rib height should be at least 3 times the wall thickness (T) for most effective strength. Draft should be ½ deg. per side nominal. Fillets at the base of the rib should be .030” minimum.
Multiple ribs should be placed at least 2 times the wall thickness apart to help reduce molded in stress as well as any problems cooling (see Fig. 8)
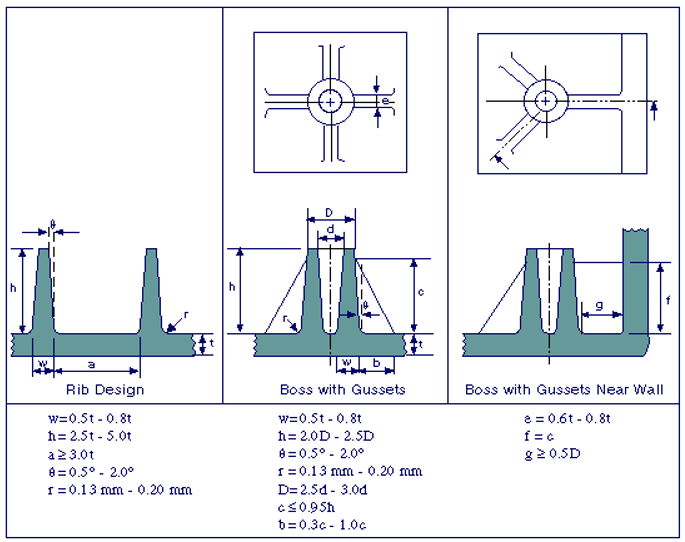 Fig. 8
Radii and Corners
Sharp corners should be avoided in any plastic part design. They are the primary cause of part failure, stress concentrations, poor flow patterns and increased injection mold wear (see Fig. 9). Indicate radii at the inside and outside corners to the maximum which the part design will allow.
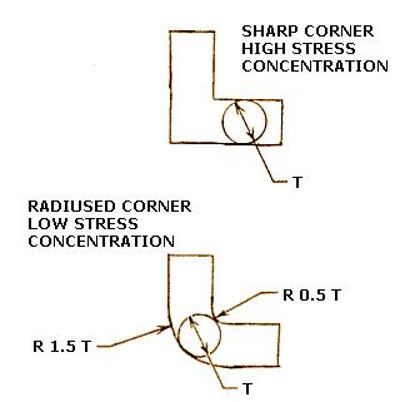 Fig. 9
Material Shrinkage
Shrinkage is a characteristic of the polymer used to manufacture the part. The molded part will shrink down in size for up to 24 hours post molding effecting the part geometry. Determining the proper amount of shrinkage to use to design and build the mold is both art and science. Every polymer has a unique shrink rate that must be applied to the 3D part model. Unfortunately, shrink rate information is not always provided by the polymer vendor. In some instances when it is provided, it is typically a wide range. Careful thought must go into selecting the proper shrinkage and it is necessary that the grade of polymer be selected prior to designing the injection mold. A good Plastics Engineer has the experience to help make the best shrinkage decision for your product and polymer.
Material shrinkage can vary with part and mold design; thick walls will shrink more than thin walls, variation in part thickness or geometry will cause differential shrinkage and warping; flow direction will also effect shrinkage especially when using fiber filled polymers.
Shrinkage is also influenced by process conditions. As cavity pressures rise, shrinkage will normally decrease. The mold and melt temperature will also greatly effect shrinkage. Cooler molds will reduce shrinkage while hotter melt temperatures will increase shrinkage.
Gating
There are several different types of gating methods. The gate design and type is dependent upon the part design, material selection, cosmetic and dimensional requirements of the end product. (See Fig. 10) The gate connects the part to the runner system and is a necessary evil to the part designer. The gate design and location is dependent upon the part geometry, mold design and polymer choice.
- Gates should be located away from high stress or impact areas.
- Gate designs should eliminate secondary de-gating operations as possible.
- The gate should be located in area to best fill the part and typically placed in the thickest area
- In some cases, multiple gates will be necessary dependent upon part size, geometry and polymer selection.
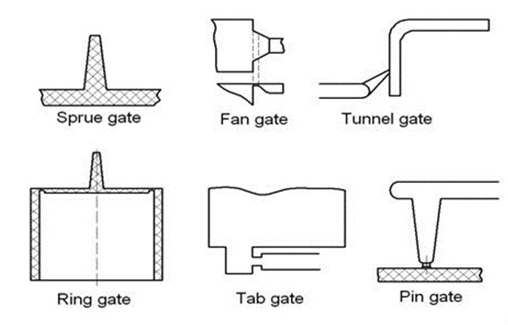 Fig. 10
Vents
Vents are areas designed into the injection mold to allow for gases to escape during the molding process. Lack of proper venting will cause excessive injection pressure, short shots, burn marks, sink and splay. There are many ways to vent a mold, but is typically done by machining numerous shallow channels at the parting line. The size of the gate will depend upon the material selection. Other ways to vent a mold are ejector pins, vent pins and runners. Vents can be cut into the ejector pins to allow the gas to escape as the cavity is filled. Vent pins are placed within the geometry of the part when venting is required to remove gas from the mold during filling and when vents solely on parting line are inadequate.
Knit/Weld Lines
Knit lines, also known as weld lines are areas in the molded part where two or more flow fronts converge. The area generally has lower strength than the other areas of the part. (See Fig. 11) The part design must take into account possible knit line locations and work to direct them away from higher stress areas. Knit lines generally form on the opposite side of holes and obstacles which are in the way of the nominal flow path, such as pins that form holes in the part or bosses. Mold flow software can be used to simulate the filling of plastic into the cavity and aid in identifying areas that could present cosmetic or mechanical performance issues.
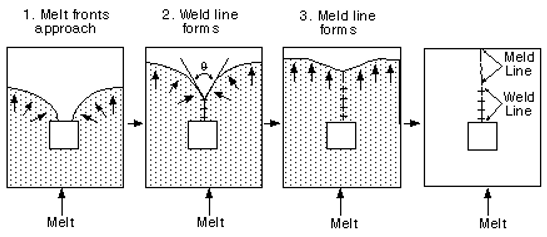 Fig. 11
